Creating custom Zigbee device for Home Assistant using ESP32-H2
I recently became interested in home automation, and while I could probably buy all of the sensors I wanted off the shelf, I decided I want to be able to make at least some of them. For the brain of my smart home I chose Home Assistant, as it is probably the most used open source solution and installing it as a Docker container was reasonably simple (though it’s evident that it’s primarily intended to be run as a VM or a standalone OS). Now, I see three ways for smart home devices to communicate with Home Assistant:
- Using WiFi (I even did some low power WiFi experiments some time ago), this is simpler hardware-wise, as I could just use an ESP32 and either program it myself or use something like ESPHome or Tasmota. But there are also disadvantages – most of the store-bough devices need a special app to configure them, I do not want it to be reliant on some cloud server and generally I am not sure about the stability of my WiFi network with 40 devices on it.
- Using Zigbee (or some other 802.15.4 radio protocol like Thread). This seems like the most popular choice, as there is a wide selection of Zigbee devices. Another advantage of Zigbee over WiFi is that it’s a mesh network, so that any Zigbee router automatically extends the network range.
- Using some custom protocol, probably built over the SX1280, which is a great chip I work with at work (though the documentation and support for it is the worst I’ve ever seen).
After some thoughts I decided to stick with Zigbee, but I still needed to find an IC I could use without learning a whole new toolchain and ecosystem. My first choice was the STM32WB-series, as I have the Nucleo boards at home from some previous experiments two years ago. Back then, I spent like three days trying to wrap my head around the ridiculous firmware architecture, but surely ST has improved it since then, right? Well, after spending another day with the provided examples, I gave up. The code is a terrible mix of generated parts, libraries and some glue logic, the Zigbee stack itself runs an a second core, so it’s a blackbox and you need to use poorly documented commands, and also most of the firmware examples are based on some ridiculous ‘sequencer’, so analyzing the code is a total nightmare. I mean, why not use some RTOS like normal people, so that the examples are clear to anyone who has ever used one and most debuggers can list tasks, queues and such?
So, after giving up with the STM32WB, I started looking at alternatives. It seems like a lot of people are using Zigbee chips from Texas Instruments or Sillicon Labs, but I did not want to start learning an entire new ecosystem just for a couple of sensors. Then I discovered that Espressif makes Zigbee-compatible chips – ESP32-C6 (which also has WiFi) and the newer ESP32-H2. They are very nicely priced (the H2, which I chose, is less than 2 EUR/pc), you can get them in a hand-solderable SoM (again, for a very good price) and the provided SDK examples looks reasonable. The biggest disadvantage (at least with the H2, which I chose) is that while Espressif claims it’s in mass production, only a couple of distributors have it, and for example the WROOM-02 SoM is not available anywhere.
Another thing worth mentioning is that Espressif provides a firmware example called NCP (Network Co-Processor), which turns the cheap H2 into a UART/SPI controlled radio chip, which could come in handy if someone want to use ie. an STM32 as the main processor, but still connect it to a Zigbee network. However, even after reading through all the provided examples, I still wasn’t sure if I would be able to use the H2 in Home Assistant out-of-the-box.
Having made my choice, I got the DevKit – again, it was really cheap – and installed the required VS Code extension. All done in a couple of minutes, in an IDE I am familiar with. The extension itself provides a couple of Zigbee templates to start with, but at least for me they used some sort of older API, where some calls had a slightly different signature, compared to a whole new project. But if you just want to try them out, they worked out with Zigbee2mqtt/HA just fine. But if you want to start from a normal ESP32-H2 project and add Zigbee:
- download the Zigbee and Zboss libraries from the ESP component registry
- reload the SDK menuconfig and in it, enable Zigbee and set the device role
- also in the menuconfig, under Partition table, select
Custom partition table csv, create an empty csv file and paste this into it:
nvs,        data, nvs,      0x9000,  0x6000,
phy_init,   data, phy,      0xf000,  0x1000,
factory,    app,  factory,  0x10000, 900K,
zb_storage, data, fat,      0xf1000, 16K,
zb_fct,     data, fat,      0xf5000, 1K,
The most basic Zigbee code, which will get connect to zigbee2mqtt and expose the basic cluster is this:
#include "esp_zigbee_core.h"
#include "esp_check.h"
#include "nvs_flash.h"

#include <cstring>


static const char *TAG = "ZB_TEST";


static void bdb_start_top_level_commissioning_cb(uint8_t mode_mask)
{
    ESP_ERROR_CHECK(esp_zb_bdb_start_top_level_commissioning(mode_mask));
}


void esp_zb_app_signal_handler(esp_zb_app_signal_t* signal_struct)
{
    esp_err_t err_status = signal_struct->esp_err_status;
    esp_zb_app_signal_type_t sig_type = (esp_zb_app_signal_type_t)(*(signal_struct->p_app_signal));

    switch (sig_type)
    {
        case ESP_ZB_ZDO_SIGNAL_SKIP_STARTUP:
            ESP_LOGI(TAG, "Zigbee stack initialized");
            esp_zb_bdb_start_top_level_commissioning(ESP_ZB_BDB_MODE_INITIALIZATION);
            break;
        case ESP_ZB_BDB_SIGNAL_DEVICE_FIRST_START:
        case ESP_ZB_BDB_SIGNAL_DEVICE_REBOOT:
            if (err_status == ESP_OK)
            {
                ESP_LOGI(TAG, "Device started up in %s factory-reset mode", esp_zb_bdb_is_factory_new() ? "" : "non");
                if (esp_zb_bdb_is_factory_new())
                {
                    ESP_LOGI(TAG, "Start network steering");
                    esp_zb_bdb_start_top_level_commissioning(ESP_ZB_BDB_MODE_NETWORK_STEERING);
                }
                else
                    ESP_LOGI(TAG, "Device rebooted");
            }
            else
                ESP_LOGW(TAG, "Failed to initialize Zigbee stack (status: %s)", esp_err_to_name(err_status));       // commissioning failed
            break;
        case ESP_ZB_BDB_SIGNAL_STEERING:
            if (err_status == ESP_OK)
            {
                esp_zb_ieee_addr_t extended_pan_id;
                esp_zb_get_extended_pan_id(extended_pan_id);
                ESP_LOGI(TAG, "Joined network successfully (Extended PAN ID: %02x:%02x:%02x:%02x:%02x:%02x:%02x:%02x, PAN ID: 0x%04hx, Channel:%d, Short Address: 0x%04hx)",
                        extended_pan_id[7], extended_pan_id[6], extended_pan_id[5], extended_pan_id[4],
                        extended_pan_id[3], extended_pan_id[2], extended_pan_id[1], extended_pan_id[0],
                        esp_zb_get_pan_id(), esp_zb_get_current_channel(), esp_zb_get_short_address());
            }
            else
            {
                ESP_LOGI(TAG, "Network steering was not successful (status: %s)", esp_err_to_name(err_status));
                esp_zb_scheduler_alarm((esp_zb_callback_t)bdb_start_top_level_commissioning_cb, ESP_ZB_BDB_MODE_NETWORK_STEERING, 1000);
            }
            break;
        default:
            ESP_LOGI(TAG, "ZDO signal: %s (0x%x), status: %s", esp_zb_zdo_signal_to_string(sig_type), sig_type, esp_err_to_name(err_status));
            break;
    }
}


static esp_err_t zb_action_handler(esp_zb_core_action_callback_id_t callback_id, const void* message)
{
    switch (callback_id)
    {
        case ESP_ZB_CORE_SET_ATTR_VALUE_CB_ID:
		{
			esp_zb_zcl_set_attr_value_message_t* setAtrMsg = (esp_zb_zcl_set_attr_value_message_t*)message;
			ESP_LOGI(TAG, "Received message: endpoint %d, cluster 0x%x, attribute 0x%x, data size %d", setAtrMsg->info.dst_endpoint, setAtrMsg->info.cluster,
             	setAtrMsg->attribute.id, setAtrMsg->attribute.data.size);
			break;
		}
        case ESP_ZB_CORE_CMD_DEFAULT_RESP_CB_ID:
		{
            esp_zb_zcl_cmd_default_resp_message_t* msg = (esp_zb_zcl_cmd_default_resp_message_t*)message;
            ESP_LOGI(TAG, "Default response callback: dst 0x%x, status: %u", msg->info.dst_address, msg->status_code);
            break;
		}
        default:
            ESP_LOGW(TAG, "Unhandled Zigbee action 0x%x callback", callback_id);
            break;
    }
    return ESP_OK;
}


//for a good list of the possible attributes, see https://www.nxp.com/docs/en/user-guide/JN-UG-3115.pdf
esp_zb_attribute_list_t* createBasicCluster(uint8_t powerSource, const char* manufacturerName, const char* modelName)
{
	esp_zb_basic_cluster_cfg_s basicConfig =
	{
		.zcl_version = ESP_ZB_ZCL_BASIC_ZCL_VERSION_DEFAULT_VALUE,
		.power_source = 4			//DC source, see note page 178
	};
	auto cluster = esp_zb_basic_cluster_create(&basicConfig);		//this creates all three mandatory attributes

	char strBuf[34];
	if (manufacturerName)
	{
		strncpy(&strBuf[1], manufacturerName, 32);
		strBuf[0] = strlen(manufacturerName);
		esp_zb_basic_cluster_add_attr(cluster, ESP_ZB_ZCL_ATTR_BASIC_MANUFACTURER_NAME_ID, strBuf);
	}
	if (modelName)
	{
		strncpy(&strBuf[1], modelName, 32);
		strBuf[0] = strlen(modelName);
		esp_zb_basic_cluster_add_attr(cluster, ESP_ZB_ZCL_ATTR_BASIC_MODEL_IDENTIFIER_ID, strBuf);
	}

	return cluster;
}


void app_main(void)
{
	ESP_ERROR_CHECK(nvs_flash_init());

	//config the radio platform
    esp_zb_platform_config_t config;
    config.radio_config.radio_mode = ZB_RADIO_MODE_NATIVE;
    config.host_config.host_connection_mode = ZB_HOST_CONNECTION_MODE_NONE;
    ESP_ERROR_CHECK(esp_zb_platform_config(&config));

	//initialize Zigbee stack
    esp_zb_cfg_t zb_nwk_cfg;
	zb_nwk_cfg.esp_zb_role = ESP_ZB_DEVICE_TYPE_ED;
	zb_nwk_cfg.install_code_policy = false;
	zb_nwk_cfg.nwk_cfg.zed_cfg.ed_timeout = ESP_ZB_ED_AGING_TIMEOUT_64MIN;
	zb_nwk_cfg.nwk_cfg.zed_cfg.keep_alive = 3000;
    esp_zb_init(&zb_nwk_cfg);

	//create & populate cluster list
    esp_zb_cluster_list_t* cluster_list = esp_zb_zcl_cluster_list_create();
	esp_zb_cluster_list_add_basic_cluster(cluster_list, createBasicCluster(4, "embedblog", "ESP32H2-DevKit"), ESP_ZB_ZCL_CLUSTER_SERVER_ROLE);

	//create endpoint list and populate it
	esp_zb_ep_list_t* ep_list = esp_zb_ep_list_create();
	esp_zb_endpoint_config_t endpointConfig;
	endpointConfig.endpoint = 10;
	endpointConfig.app_profile_id = ESP_ZB_AF_HA_PROFILE_ID;
	endpointConfig.app_device_id = ESP_ZB_HA_ON_OFF_OUTPUT_DEVICE_ID;
	esp_zb_ep_list_add_ep(ep_list, cluster_list, endpointConfig);
    esp_zb_device_register(ep_list);

	//zigbee startup
	esp_zb_core_action_handler_register(zb_action_handler);
	ESP_ERROR_CHECK(esp_zb_start(false));
    esp_zb_main_loop_iteration();
}
The app_main initializes the non volatile memory, radio platform, the zigbee stack and then registers one endpoint with one basic cluster. Then, before the startup, the action handler is registered – this handler deals mostly with actions regarding the generated clusters and endpoints. Another handler, esp_zb_app_signal_handler, must also be present, otherwise you’ll get a linker error. This handler is responsible for handling the network level actions. But in general, there is very little info about these handlers, I got them from Esspresif’s examples. To give you an idea, this code occupies 422 kB, so about 20 % of the smaller 2 MB flash version of the ESP32-H2.
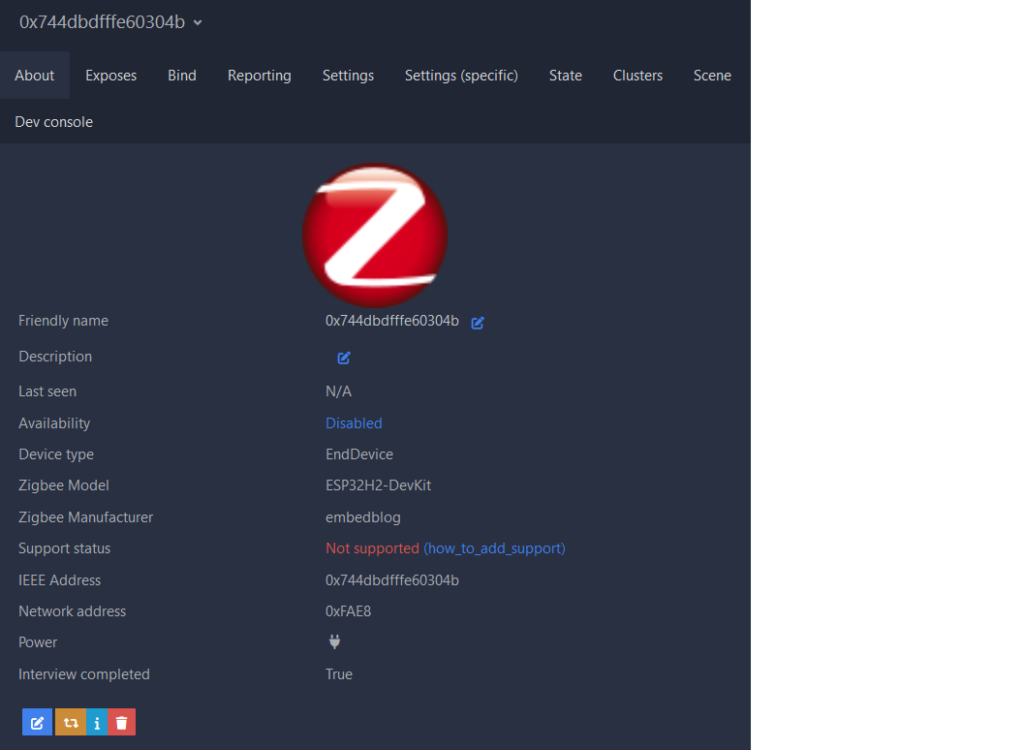
Just flash this code to the device and enable pairing in zigbee2mqtt. This is what should be reported:

The device will also automatically be added to HA, but you won’t be able to do much with it:

In order to make this code actually useful, you’d need to add another cluster with some functions (on/off control, temperature sensor etc.) to the HA endpoint. Zigbee2mqtt will allow you to control these clusters directly from the ‘Exposes’ tab. Of course the above code is a minimal example, for anything remotely usable an LED indicating the current status (ideally also with the Identify function), button to enable pairing and finally some useful cluster are needed.
Also note that once you pair the device with zigbee2mqtt, it saves it’s basic cluster data (device and manufacturer data etc.). If you then change these in the ESP’s code and reupload the firmware, zigbee2mqtt will keep the old data and deleting and re-pairing the device won’t help. I also tried calling esp_zb_factory_reset(), but that didn’t help either. The only two ways to force Zigbee2mqtt to reload the data I found worked reliably:
- changing the device’s IEEE address using
esp_zb_set_long_address, but this is very ugly, in my opinion - restarting the whole zigbee2mqtt service, which is my preferred option
Conclusion
I was really surprised how easy this was to set up, and even though it is evident that Espressif’s Zigbee stack is relatively new, the documentation was usable and everything worked without any bugs. So now I just need to get my hands on the H2-WROOM-02 modules and I can start creating Zigbee sensors in my lab.